Care Level: I'm Easy


About Your Indoor Jungle Delivered
Turn any space into a paradise!
Get surprise plant friends delivered to you and immediately create your new favorite green space. Get ready for your own personal urban jungle with just one click.
*Plants ship in grower pots
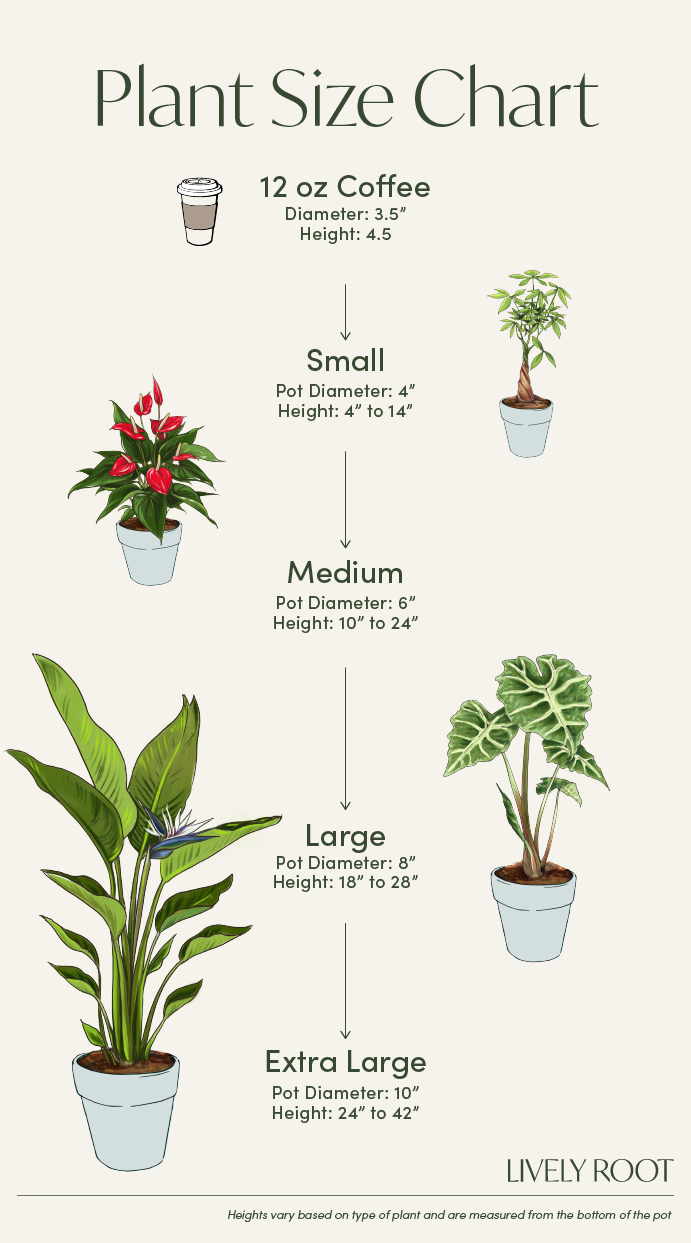
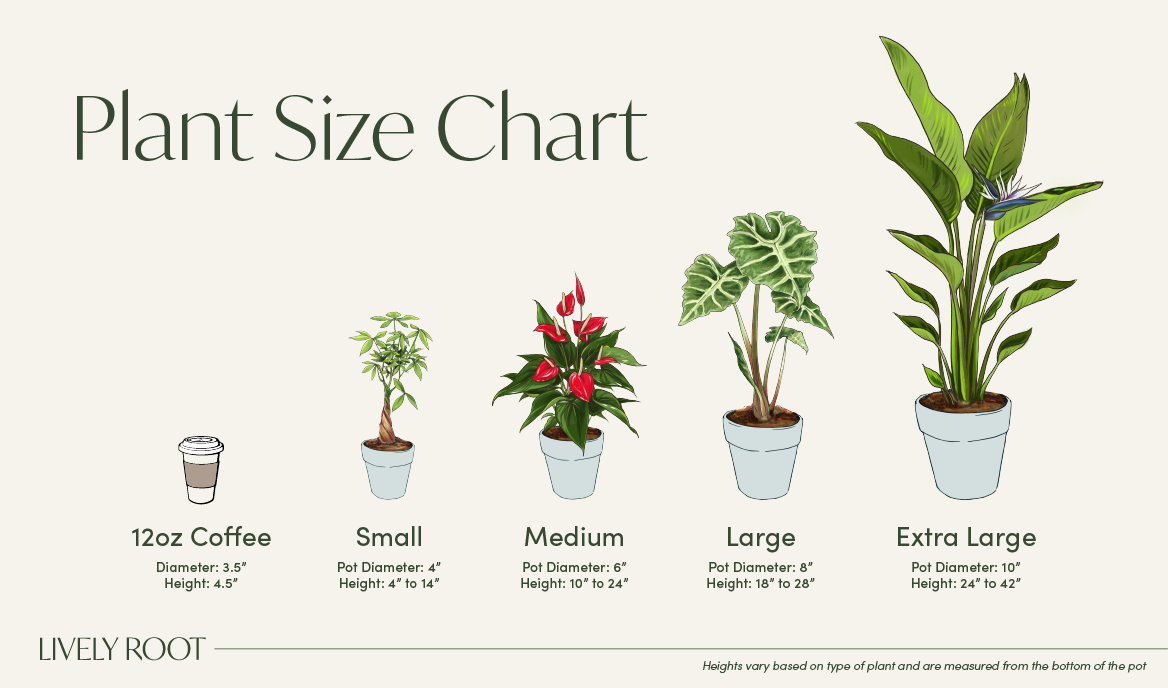
Numbers of Plants Included In Each Jungle
-
Tiny Jungle - 2 Small & 2 Medium
-
Urban Jungle - 2 Small & 2 Medium & 2 Extra Large
-
The Amazon - 4 Small & 4 Medium & 2 Extra Large - MOST POPULAR!
-
I'm In The Jungle Book - 4 Small & 4 Medium & 4 Extra Large - BEST BANG FOR YOUR BUCK!
Looking for a Pet-friendly Jungle? Click here!
Plant Care Guides
- Pilea peperomioides
- Spathiphyllum
- Calathea lancifolia
- Zamioculcas zamiifolia
- Epipremnum aureum
- Anthurium spp. - Red
- Ficus robusta 'Burgundy'
- Sansevieria trifasciata 'Laurentii'
- Strelitzia nicolai
- Monstera deliciosa
- Pachira aquatica
- Ficus lyrata
-
-
LightMedium
Medium to bright indirect light. Never direct sunlight.
-
WaterMedium
Let the soil dry between waterings.
-
HumidityLow
No extra humidity required.
-
Temperature 70 to 80
Keep this plant consistently in warm temperatures inside with nighttime temperatures decreasing to only 60°F-70°F.
-
Hardiness Zones10|11|12
Outside: Grow in dappled shade in morning sun where nights are above 50°F.
Indoors: The Chinese Money Plant enjoys medium to bright, indirect light.
-
FertilizingMonthly
Water the Chinese Money Plant one day prior to fertilizing. Fertilize once a month by diluting a liquid fertilizer by half strength. Let the plant rest in the fall and winter.
-
Re-potting2 Years
When receiving the plant, do not repot immediately but wait at least 6-12 months or if the roots are beginning to get crowded and growing through the drainage holes.
Repot in the spring, using a 2" bigger pot to keep the roots drier. (Too big of a pot could cause the soil to dry slower, which is not helpful.) Use a well-draining indoor potting mix with perlite to help with drainage or a cacti and succulent mix.
Water your plant in the old pot before transferring over and let them sit an hour. Place a piece of screening at the bottom of the container over the drainage hole to secure the soil and allow it to drain. Add soil to the bottom to elevate the root ball. Lift the plant and release the roots against the existing planter. Use a clean knife or garden trowel to wedge between the pot and the soil to loosen.
Inspect the root ball. Notice if there are any dead or rotting roots and trim off with sterile pruners. If the plant is rootbound, cut through the roots to alleviate continued encircling.
Ensure the plant is sitting about 1" below the edge of the pot to avoid water spillage. Add more soil and backfill around the sides by tamping down. Fill up to the soil line but not over.
Water thoroughly, leaving the soil damp but not soggy. If settling occurs, add more soil.
-
CleaningMonthly
To clean the leaves and alleviate dust particles, give it a shower from above. Fill a watering can with filtered, distilled or tap water that has been sitting for 24 hours. Place the plant in a sink and lightly wash the leaves with a shower spray end watering can.
-
PropagationDivision|Stem Cutting
In early spring, take a pilea cutting, use a sharp knife to cut off pinkish red baby offshoots from the main stem. Remove at least an inch of stalk under the soil leading to the main stem. Be careful not to catch the knife of the healthy leaves on the mother plant.
If there is no root ball, remove all the soil and place in a vase with water to root. Change the water each week with filtered, bottled or tap water that has been sitting at least 24 hours.
If there is a root ball, then separate the mother plant from the babies and pot up. Follow the instructions below.*
After 3-4 weeks, check to make sure the stem has well formed roots. If so, it's time to plant.
*Fill a small container with drainage holes (too large of a container for the cutting will make it difficult to regulate watering needs) using indoor well-draining potting mix such as cacti and succulent mix.
Mix a little rooting hormone into the soil. Poke a hole in the soil with a pencil. Then, place the cutting in the hole and tamp the soil down around it.
Water the plant and keep them in medium to bright indirect sunlight. After 4-6 weeks, the roots should be established.
-
-
-
LightMedium
Best in medium light, but can survive in a range of low to high.
-
WaterMedium
Allow the soil to dry out completely between waterings.
-
HumidityMedium
Prefers humidity. Spritz occasionally.
-
Temperature 65 to 80
Keep this plant out of cold drafts near open windows or doors.
-
Hardiness Zones10|11
Outside: Keep them in full shade on a patio out of direct sunlight to prevent leaf burn.
-
FertilizingSeasonally
Peace lilies are not heavy feeders therefore, every six weeks is sufficient for their nutrient needs. Add a balanced liquid fertilizer to your water and dilute it by half. Fertilize throughout the late winter, early spring and summer months. Note: If your peace lily is not blooming, move them to a brighter area in the house to get indirect sun.
-
Re-potting2 Years
When receiving the plant, do not repot immediately but wait at least 6-12 months or if the roots are beginning to get crowded and growing through the drainage holes.
Repot in the spring, using a 2"" bigger pot to keep the roots drier. (Too big of a pot could cause the soil to dry slower, which is not helpful.) Use a well-draining indoor potting mix with perlite to help with drainage.
Water your plant in the old pot before transferring over and let sit an hour. Place a piece of screening at the bottom of the container over the drainage hole to secure the soil and allow to drain. Add soil to the bottom to elevate the root ball. Lift the plant and release the roots against the existing planter. Use a clean knife or garden trowel to wedge between the pot and the soil to loosen.
Inspect the root ball. Notice if there are any dead or rotting roots and trim off with sterile pruners. If the plant is rootbound, cut through the roots to alleviate continued encircling.
Ensure the plant is sitting about 1"" below the edge of the pot to avoid water spillage. Add more soil and backfill around the sides by tamping down. Fill up to the soil line but not over.
Water thoroughly, leaving the soil damp but not soggy. If settling occurs, add more soil.
-
CleaningAfter bloom begins to die
Each time a flower blooms on the peace lily and turns brown, cut the stem off at the base. Prune off any yellowing leaves at the base of the stem. Clean any debris off the soil's surface. To clean, place the plant into a tub or shower. Use a watering can with a shower attachment using distilled, filtered, or water without chlorine or chemicals. Pour the water over the plant to wash away any dust. Do this each quarter to keep your plant's leaves clean.
-
PropagationDivision
Propagate and divide your Peace Lily plant in the early spring.
Hydrate the plant the night before.
Pull from the container and brush or wash away the soil carefully around the roots. Carefully divide and repot in rich, indoor peat-based potting soil mix, being aware that each new plant needs at least two or more leaves with sufficient roots attached.
Use a container 2 inches bigger than the root ball with drainage and deep enough for their roots to grow. Place the plant at the same level as the previous pot adding soil at the bottom.
Water the soil and add more soil if settling occurs.
Set them in medium to bright, indirect sunlight while they are rooting.
Check the moisture and humidity each day and add misting to keep the soil moist while the roots establish.
After 6-8 weeks, roots will begin to establish. You can tug onto the stem to ensure the roots are anchoring well.
-
-
-
LightMedium
This plant enjoys bright to medium indirect light.
-
WaterMedium
Keep the soil slightly moist and water when the soil reaches a #5 on the moisture meter. Use filtered, bottled, or tap water sitting 24 hours to release the chemicals and water enough to discharge out of the drainage holes. Once the water is fully drained, replace it into the cache or decorative pot. Don't let the roots sit in standing water. During winter months, water less frequently but keep it humid around the plant.
-
HumidityHigh
Add up to 60% humidity by adding a pebble tray filled with water, grouping with other plants or using a humidifier.
-
Temperature 65 to 75
Avoid any sudden temperature changes. Keep humidity high in warmer temperatures.
-
Hardiness Zones10|11
Outside: Grow in morning light, partial shade (4-6 hours) where nights are above 45°F. Indoors: The Rattlesnake Plant prefers bright to medium, indirect light for at least six hours in a southern, eastern and western windows.
-
FertilizingMonthly
Fertilize monthly during its growing period. Use a high nitrogen liquid fertilizer at half strength to increase foliage health. Reduce during the fall and winter months while the plant is in its dormant phase. Flush the soil periodically to eliminate salts from fertilizing.
-
Re-potting2 Years
When receiving the plant, do not repot immediately but wait at least 6-12 months. Repot in the spring, using a 2" wider pot. (Too large of a pot could cause the soil to dry slower, which is not helpful.) Use a well-draining indoor potting mix with perlite to help with drainage or an african violet potting mix. Place a piece of screening at the bottom of the container over the drainage hole to secure the soil and allow it to drain. Add soil to the bottom to elevate the root ball. Lift the plant and release the roots against the existing planter. Use a clean knife or garden trowel to wedge between the pot and the soil to loosen. Inspect the root ball. Notice if there are any dead or rotting roots and trim off with sterile pruners. If the plant is rootbound, cut through the roots to alleviate continued encircling. Ensure the plant is sitting about 1" below the edge of the pot to avoid water spillage. Add more soil and backfill around the sides by tamping down. Fill up to the soil line but not over. Water thoroughly, leaving the soil damp but not soggy. If settling occurs, add more soil. Enclose the new plantings in plastic bags, mist and keep them in medium light. Remove the plastic bag when the roots are established. You may observe some leaf changes as it acclimates to its new environment. It may suffer some transplant shock depending on how tight the roots were intertwined together. Trim off any declining leaves as it regains its energy and gets rooted into the soil over time.
-
CleaningMonthly
Trim off any dead or damaged stems to keep energy moving to the healthy leaves. Shower the leaves using a watering can with filtered or rainwater to remove dust. Remove any debris on the soil and replenish soil if needed.
-
PropagationDivision
Indoors: Propagate and divide Zebra plants in the early spring when emerging from dormancy. Pull from the container and brush or wash away the soil carefully. Carefully divide and repot in African violet mix. Use a container that has drainage and is deep enough for the roots to grow. Set it in medium to bright, indirect sunlight while they are rooting. Enclose the new plantings in clear plastic bags, mist and keep them in medium light. Remove the plastic bag when the roots are established. You may observe some leaf changes as it acclimates to its new environment. It may suffer some transplant shock depending on how tight the roots were intertwined together. Trim off any declining leaves as it regains its energy and gets rooted into the soil over time. Check the moisture and humidity each day and add misting to keep the soil moist while the roots establish. After 6-8 weeks, roots will begin to establish. You can tug onto the stem to ensure the roots are anchoring well. You can remove the clear plastic bag at this time but still maintain high humidity around the plant. Outdoors: Carefully loosen the soil and dig the roots up and separate the plant in new locations in your garden. Add rich, damp, and loamy soil in a part-shade morning sun location. Water with filtered or rain water at soil level.
-
-
-
LightMedium
This plant prefers low to medium light.
-
WaterLow
Allow the soil to dry out completely between waterings.
-
HumidityLow
This plant doesn't require any extra humidity.
-
Temperature 65 to 75
Avoid fluctuations in temperature keeping them away from drafts.
-
Hardiness Zones9|10
Outside: Grow in filtered morning light where nights are above 50°F.
Indoors: This plant prefers bright, to medium indirect light but can tolerate low light conditions.
-
FertilizingSeasonally
ZZ plants grow slowly. Therefore, they don't need a lot of fertilizer. Apply a balanced fertilizer in the early spring and summer at half strength.
-
Re-potting2 Years
When receiving the plant, do not repot immediately but wait at least 6-8 months or if the roots are beginning to get crowded and growing through the drainage holes.
Repot in the spring, using a 2" bigger pot. (Too big of a pot could cause the soil to dry slower, which is not helpful.) Use a well-draining indoor potting mix with perlite to help with drainage.
Water your plant in the old pot before transferring over and let sit an hour.
Place a piece of screening at the bottom of the container over the drainage hole to secure the soil and allow to drain. Add soil to the bottom to elevate the rhizomes that mimic potatoes. Lift the plant and release the roots against the existing planter. Use a clean knife or garden trowel to wedge between the pot and the soil to loosen.
Inspect the rhizomes. Notice if there are any dead or rot and trim off with sterile pruners. If the plant is rootbound, separate the roots and rhizomes if you wish to make more plants. If not, remove any weak leaves off the plant to help revitalize their energy.
Ensure the plant is sitting about 1" below the edge of the pot to avoid water spillage. Add more soil and backfill around the sides by tamping down. Fill up to the soil line but not over.
Water thoroughly, leaving the soil damp but not soggy. If settling occurs, add more soil.
-
CleaningMonthly
When yellowing leaves occur throughout the season on mature plants, remove them. If stems become too arched or heavy, prune back as needed. To clean, shower them with filtered water or non-fluoridated water.
-
PropagationDivision
Indoors: Propagate and divide ZZ plants in the early spring when emerging from dormancy.
Pull from the container and brush or wash away the soil carefully around the rhizomes. Carefully divide and repot in a rich, indoor potting soil mix.
Use a container that has drainage and is deep enough for the roots to have room to grow.
Set in medium to bright, indirect sunlight while they are rooting.
Check the moisture and humidity each day and add misting to keep the soil moist while the roots establish.
After 6-8 weeks, roots will begin to establish. You can tug onto the stem to ensure the roots are anchoring well.
Outdoors:
Carefully loosen the soil and dig the roots up and separate the plant in new locations in your garden.
Add rich, damp, and loamy soil in a filtered morning sun location.
Water with filtered or rain water at the soil level.
-
-
-
LightMedium
This plant loves low to medium indirect light.
-
WaterLow
Allow the soil to dry out completely between waterings.
-
HumidityHigh
Pothos love high levels of humidity. Spritz occasionally.
-
Temperature 70 to 90
Ideally, the Pothos grows their best when temperatures are between 70°-90°F.
-
Hardiness Zones10|11
Outside: Grow in full sun (6-8 hours) to partial shade (4-6 hours) where nights are above 60°F.
Indoors: The Golden Pothos prefers bright, indirect light for at least six hours in a southern, eastern and western windows.
-
FertilizingSeasonally
Fertilize every two to three months during their growing period in the spring and summer with a balanced liquid fertilizer or topical granular soil fertilizer. Let the plant rest in the fall and winter.
-
Re-potting2 Years
When receiving the plant, do not repot immediately but wait at least 6-12 months or if the roots are beginning to get crowded and growing through the drainage holes. Repot in the spring, using a 2" bigger pot to keep the roots drier. (Too big of a pot could cause the soil to dry slower, which is not helpful.) Use a well-draining indoor potting mix with perlite to help with drainage.
Water your plant in the old pot before transferring over and let sit an hour. Place a piece of screening at the bottom of the container over the drainage hole to secure the soil and allow to drain. Add soil to the bottom to elevate the root ball. Lift the plant and release the roots against the existing planter. Use a clean knife or garden trowel to wedge between the pot and the soil to loosen. Inspect the root ball.
Notice if there are any dead or rotting roots and trim off with sterile pruners. If the plant is rootbound, cut through the roots to alleviate continued encircling. Ensure the plant is sitting about 1" below the edge of the pot to avoid water spillage. Add more soil and backfill around the sides by tamping down. Fill up to the soil line but not over. Water thoroughly, leaving the soil damp but not soggy. If settling occurs, add more soil.
-
CleaningMonthly
To clean the leaves and alleviate dust particles: Shower them from above. Fill a watering-can with filtered, distilled, or tap water that has been sitting for 24 hours and is free of chemicals (chlorine or fluoride). Place the plant in a sink and lightly wash the leaves with a shower spray end watering can. Trim off any yellow leaves with sterile scissors. Remove any debris from the soil and replenish soil if needed. Inspect for any insects at this time. Prune the vines up to 2 inches from the soil line to create lushness at the top. As they spills over the rim of the container, trim to maintain their shape and size at your preference. Remove any dried or discolored leaves to keep the plant vigorous.
-
PropagationStem Cutting
Stem Cutting: In early spring, take a pothos cutting, use sharp pruners to remove a cutting from a tip off the vine. Cut at least 5-6 inches of stem to propagate. Place in a vase with water to root. Change the water each week with filtered, bottled, or tap water sitting at least 24 hours.
After 3-4 weeks, check to make sure the stem has 1-2 inch, well-formed roots. If so, it's time to plant. *Fill a small container with drainage holes (too large of a container for the cutting will make it challenging to regulate watering needs) using an indoor well-draining potting mix. Mix a little rooting hormone into the soil. Poke a hole in the soil with a pencil. Then, place the cutting in the hole and tamp the soil down around them. Water the plant and keep them in medium to bright indirect sunlight. After 4-6 weeks, the roots should establish.
Division: Divide the Golden Pothos in the early spring when emerging from dormancy. Pull from the container and cut through the roots with a sharp knife or pruners. Repot in a rich, indoor potting soil mix. Use a container 2 inches bigger than the root ball with drainage and is deep enough for the roots to grow. Place the roots at the same level as the previous pot adding soil at the bottom if necessary. Set them in bright, indirect sunlight and water. Check the moisture and humidity each day and add misting to keep the soil moist while the roots establish. After 6-8 weeks, roots will begin to form. You can tug onto the stem to ensure the roots are establishing.
-
-
-
LightMedium
Medium to bright indirect light. Never direct sunlight.
-
WaterMedium
Water thoroughly, but allow them to dry slightly between waterings.
-
HumidityHigh
Enjoys high humidity. Spritz occasionally.
-
Temperature 60 to 90
Ideally, the Flamingo Flower likes it on average of 68° at night and upwards of 86°F during daylight hours.
-
Hardiness Zones10|11
Outside: Grow in early morning sun (2-4 hours) where nights are above 60°F.
Indoors: The Flamingo Flower prefers bright, indirect light for at least six hours in a southern, eastern and western windows.
-
FertilizingMonthly
Fertilize once a month during the growing spring and summer with a balanced liquid fertilizer or topical granular soil fertilizer. Let the plant rest in the fall and winter.
Leach salt residue buildup away by flushing the potted plant each month. Let the water run out the drain holes.
-
Re-potting2 Years
When receiving the plant, do not repot immediately but wait at least 6-12 months or if the roots are beginning to get crowded and growing through the drainage holes.
Repot in the spring, using a 2" bigger pot to keep the roots drier. (Too big of a pot could cause the soil to dry slower, which is not helpful.) Use a well-draining indoor potting mix with perlite to help with drainage.
Water your plant in the old pot before transferring over and let sit an hour. Place a piece of screening at the bottom of the container over the drainage hole to secure the soil and allow to drain. Add soil to the bottom to elevate the root ball. Lift the plant and release the roots against the existing planter. Use a clean knife or garden trowel to wedge between the pot and the soil to loosen.
Inspect the root ball. Notice if there are any dead or rotting roots and trim off with sterile pruners. If the plant is rootbound, cut through the roots to alleviate continued encircling.
Ensure the plant is sitting about 1" below the edge of the pot to avoid water spillage. Add more soil and backfill around the sides by tamping down. Fill up to the soil line but not over.
Water thoroughly, leaving the soil damp but not soggy. If settling occurs, add more soil.
-
CleaningMonthly
Gently wipe clean with a soft, damp cloth or paper towel. Work gently from the stem's base toward the leaf's tip, cleaning both sides at once. After cleaning the leaves, remove any dead leaves or debris on the surface of the soil.
Refreshen the soil mixture if needed.
Prune away damaged or diseased leaves or flowers down to the stem base with sterile scissors.
-
PropagationDivision
Indoors: Propagate and divide Flamingo Flowers in the early spring when emerging from dormancy.
Pull from the container and brush or wash away the soil carefully. Carefully divide and keep at least two rhizomes together and repot in a rich, indoor potting soil mix.
Use a container that has drainage and is deep enough for the roots to grow. Place the rhizomes at least 1-2 inches down into the soil.
Set in bright, indirect sunlight while they are rooting.
Check the moisture and humidity each day and add misting to keep the soil moist while the roots establish.
After 6-8 weeks, roots will begin to form. You can tug onto the stem to ensure the roots are establishing.
Outdoors: Carefully loosen the soil and dig the tubers up, avoiding damaging the rhizomes. Divide the rhizomes and plant in new locations in your garden. Add rich, damp, and loamy soil in a part-shade morning sun location.
-
-
-
LightMedium
Best in medium light, but can survive in a range of low to high.
-
WaterLow
Allow the soil to dry out completely between waterings.
-
HumidityMedium
Prefers humidity. Spritz occasionally.
-
Temperature 65 to 78
Keep this plant out of cold drafts near open windows or doors.
-
Hardiness Zones10|11
Outside: Keep them in full shade on a patio out of direct sunlight to prevent leaf burn.
-
FertilizingMonthly
Apply a fertilizer high in phosphorus for root development. As the leaves multiply and the plant matures, switch to a formula high in nitrogen. Apply the nutrients monthly while watering. Refrain from fertilizing during the winter to let the plant rest.
-
Re-potting2 Years
When receiving the Burgundy Rubber plant, do not repot immediately but wait at least 6-12 months or if the roots are beginning to get crowded and growing through the drainage holes.
Repot in the spring, using a 2" bigger pot to keep the roots drier. (Too big of a pot could cause the soil to dry slower, which is not helpful.)
Place a piece of screening at the bottom of the container over the drainage hole to secure the soil and allow it to drain. Use a well-draining indoor potting mix with perlite to help with drainage.
Water your plant in the old pot before transferring over and let them sit an hour.
Add soil to the bottom to elevate the root ball. Lift the plant and release the roots against the existing planter. Use a clean knife or garden trowel to wedge between the pot and the soil to loosen.
Inspect the root ball. Notice if there are any dead or rotting roots and trim off with sterile pruners. If the plant is rootbound, cut through the roots to alleviate continued encircling.
Ensure the plant is sitting about 1" below the edge of the pot to avoid water spillage. Add more soil and backfill around the sides by tamping down. Fill up to the soil line but not over.
Water thoroughly, leaving the soil damp but not soggy. If settling occurs, add more soil.
Water well to dampen the soil and let it drain.
-
CleaningMonthly
Gently wipe clean with a soft, damp cloth or paper towel. Work gently from the stem's base toward the leaf's tip, cleaning both sides at once. After cleaning the leaves, remove any dead leaves or debris on the surface of the soil.
Refresh the soil mixture if needed.
Wear gloves to prevent skin irritation before pruning away damaged or diseased leaves. Cut down to the stem base with sterile scissors.
To shape your plant, cut above where the leaf attaches to the stem. Here the plant will stimulate new growth and branch into two stems, and form young leaves making the rubber plant bushier.
When giving them a shapely look, only remove one-third of the plant's branches. At this point, they may look a little barren but will fill in during the growing season.
Use the pruned stems for propagation.
-
PropagationCuttings
Take a cutting between two nodes (where the leaves emerge from the stem) with several leaves on the cutting.
Remove the bottom set of leaves.
Dip the cuttings in a rooting hormone.
Use a pot with drainage. and place the stem in damp, well-draining, moist potting soil mix and tamp down around the stem securing it.
Place the stem at least 1-2 inches down into the soil. Place a clear plastic bag over the cutting to mimic a greenhouse and mist the bag.
Set them in bright, indirect sunlight while they are rooting.
Check the moisture and humidity each day and add misting to keep the soil moist while the roots establish.
After 6-8 weeks, roots will begin to establish. You can tug onto the stem to ensure the roots are secure.
-
-
-
LightMedium
Best in medium light, but can survive in a range of low to high.
-
WaterLow
Allow the soil to dry out completely between waterings.
-
HumidityLow
Doesn't prefer humidity, but they can tolerate it.
-
Temperature 55 to 85
Keep on the warmer side to keep them growing healthy.
-
Hardiness Zones9|10|11
Outside: Grow in morning light, partial shade (4-6 hours) where nights are above 45°F.
Indoors: This plant prefers bright, to medium indirect light but can tolerate low light conditions.
-
FertilizingEvery two years
Sansevierias don't need a lot of fertilizer so fertilize only twice a year in the early spring and mid-summer. Use a balanced liquid fertilizer.
-
Re-potting3 Years
When receiving the Snake plant, do not repot immediately but wait at least 6-12 months. They like to be a bit root-bound. Repot in the spring, using a 2" bigger pot to keep the roots drier. (Too big of a pot could cause the soil to dry slower, which is not helpful.) Use a succulent soilless potting mix with perlite to help with drainage. Place a piece of screening at the bottom of the container over the drainage hole to secure the soil and allow to drain.
Use a well-draining cacti and succulent potting mix with perlite to help with drainage.
Water your plant in the old pot before transferring over and let sit an hour.
Add cacti and succulent soil to the bottom to elevate the root ball. Lift the plant and release the roots against the existing planter. Use a clean knife or garden trowel to wedge between the pot and the soil to loosen.
Inspect the roots. Notice if there are any dead or rotting roots and trim off with sterile pruners.
Ensure the plant is sitting about 1 inch below the edge of the pot to avoid water spillage. Add more soil and backfill around the sides by tamping down. Fill up to the soil line but not over.
Water thoroughly, leaving the soil damp but not soggy. If settling occurs, add more soil.
Water well to dampen the soil and let drain.
-
CleaningBi-annually
Using a sharp knife, trim off any dead or damaged leaves from the area closest to the soil. If a leaf is damaged, cut off the browning or damaged part at any point on the leaf. Remove any dust with a damp cloth wiping gently up both sides of each leaf, supporting them with the other hand. Remove any debris on the soil and replenish soil if needed.
-
PropagationCuttings
Cut a leaf off at the base and place them in a container tall enough to hold the leaf upright. Add about an inch of water at the bottom and change the water weekly. Keep the leaf in medium indirect sunlight while they are beginning to form roots. Once roots are at least 1-2 inches long, plant them with rooting hormone mixed into the well-draining succulent and cacti mix. Water and place in bright to medium, indirect light. Use a wooden dowel to train them to stand upright until the roots are more anchored and secure.
-
-
-
LightHigh
Grows best in bright, direct sunlight.
-
WaterLow
Water well when received, then allow the soil to dry out completely between waterings.
-
HumidityLow
Doesn't require any additional humidity.
-
Temperature 65 to 80
Keep this plant out of cold drafts near open windows or doors.
-
Hardiness Zones10|11|12
Outside: Keep them in part shade (morning sun) on a patio out of direct sunlight to prevent leaf burn.
-
FertilizingMonthly
Apply a liquid fertilizer especially formulated for indoor plants. Apply bimonthly during the spring, summer and fall season. Slow down the fertilizing to once a month in the winter.
-
Re-potting2 Years
When receiving the Bird of Paradise plant, do not repot immediately but wait at least 6-12 months or if the roots are beginning to get crowded and growing through the drainage holes. They prefer to be a little root bound anyway.
Repot in the spring, using a 2"" bigger pot to keep the roots drier. (Too big of a pot could cause the soil to dry slower, which is not helpful.)
Place a piece of screening at the bottom of the container over the drainage hole to secure the soil and allow to drain. Use a well-draining indoor potting mix with perlite to help with drainage.
Water your plant in the old pot before transferring over and let sit an hour.
Add soil to the bottom to elevate the root ball. Lift the plant and release the roots against the existing planter. Use a clean knife or garden trowel to wedge between the pot and the soil to loosen.
Inspect the root ball. Notice if there are any dead or rotting roots and trim off with sterile pruners. If the plant is rootbound, cut through the roots to alleviate continued encircling.
Ensure the plant is sitting about 1"" below the edge of the pot to avoid water spillage. Add more soil and backfill around the sides by tamping down. Fill up to the soil line but not over.
Water thoroughly, leaving the soil damp but not soggy. If settling occurs, add more soil.
Water well to dampen the soil and let drain.
-
CleaningBi-annually
At any time of the year, remove any dead, damaged, or spent blooms to keep your plant in good health. Manage the size of the Bird of Paradise plant with hard pruning in early spring. Use sharp loppers or hand pruners and cut back leaves and stems that need thinning down to the ground. If any dead flowers are on the plant, cut the stem down to the plant's base. Remove any old, browning vegetation and clear up any debris around their base.
To clean the leaves:
Place the plant in a shower or tub.
Use a watering container with a shower head attachment.
Fill the watering can with filtered, bottled, or water that's free of chemicals and shower the plant's leaves to wash off any debris and dust.
Let them drip dry and place back into their decorative container.
-
PropagationDivision
Propagate your Bird of Paradise when repotting your plant. Hydrate the night before to help prevent severe transplant shock. Remove the plant from the pot and dust off the soil to reveal the rhizomes and root system. Use a sterilized knife to sever the right root system. Remove a rhizome with attached roots by cutting apart. Sprinkle root hormone over the cuts and place in the moist, well-draining planting mix. Keep the soil evenly wet but not soggy. Do not let the soil dry out
-
-
-
LightMedium
Medium to bright indirect light. Never direct sunlight.
-
WaterMedium
Enjoys being on the moist, but not soggy side.
-
HumidityHigh
Enjoys high humidity. Spritz occasionally.
-
Temperature 65 to 90
The Swiss Cheese Plant likes warmth and to stay above 50°F with high humidity.
-
Hardiness Zones8|9|10|11
Outside: Grow in morning light, partial shade (4-6 hours) where nights are above 50°F.
Indoors: This plant prefers bright, to medium indirect light for at least six hours in a southern, eastern and western windows.
-
FertilizingMonthly
Fertilize during their growing period in the spring and summer months between February and October every 2-3 weeks. Use a balanced liquid fertilizer at 1/2 strength. Reduce fertilizing during the fall and winter to once a month while the plant is in their dormant phase. Raise the humidity around them and never use chlorine or fluoride in the water.
-
Re-potting2 Years
When receiving the plant, do not repot immediately but wait at least 6-12 months or if the roots are beginning to get crowded and growing through the drainage holes.
Repot in the spring, using a 2" bigger pot to keep the roots drier. (Too big of a pot could cause the soil to dry slower, which is not helpful.) Use a well-draining indoor potting mix with perlite to help with drainage.
Water your plant in the old pot before transferring over and let sit an hour. Place a piece of screening at the bottom of the container over the drainage hole to secure the soil and allow to drain. Add soil to the bottom to elevate the root ball. Lift the plant and release the roots against the existing planter. Use a clean knife or garden trowel to wedge between the pot and the soil to loosen.
Inspect the root ball. Notice if there are any dead or rotting roots and trim off with sterile pruners. If the plant is rootbound, cut through the roots to alleviate continued encircling.
Ensure the plant is sitting about 1" below the edge of the pot to avoid water spillage. Add more soil and backfill around the sides by tamping down. Fill up to the soil line but not over.
Water thoroughly, leaving the soil damp but not soggy. If settling occurs, add more soil.
-
CleaningBi-annually
Wear gloves while working with this plant, as they have a sap that causes skin irritation. Trim off any yellowing bottom leaves down to the base of the stem using a sharp knife. Remove any debris off the soil surface. Train your plant to grow up a moss pole and tie them up to promote upward growth. Wipe the leaves with a clean, damp cloth using filtered or rain water. Support the leaf by wiping them from the stem to the tip of the leaf on both sides. Spritzing the leaves is another way to wet them and wipe them clean.
-
PropagationCuttings
Take cuttings just below an aerial root.
Remove the bottom leaves on the stem with sterile scissors or a knife. Place the cutting in a container tall enough to hold the leaf upright. Add about an inch of water at the bottom and change the water weekly.
Keep the leaf in medium indirect sunlight while they are beginning to form roots.
Once roots are at least 1-2 inches long, plant them with rooting hormone mixed into the well-draining potting mix.
Water and place in bright to medium, indirect light.
-
-
-
LightHigh
Bright, indirect light to filtered sun.
-
WaterMedium
Allow the soil to dry out completely between waterings.
-
HumidityMedium
Enjoys moderate to high levels of humidity. Spritz occasionally.
-
Temperature 65 to 75
Ideally, the Money Tree likes the room temperature at 72°F. They handle warmth rather than cold so keep them away from cold drafts.
-
Hardiness Zones10|11|12
Outside: Grow in morning light, partial shade (4-6 hours) where nights are above 45°F.
Indoors: The Money Tree prefers bright, indirect light for at least six hours in a southern, eastern and western windows.
-
FertilizingMonthly
Fertilize bimonthly during their growing period. Use a balanced liquid fertilizer at 1/2 strength. Reduce during the fall and winter months while the plant is in their dormant phase and refrain from watering as much so they can rest.
-
Re-potting2 Years
When receiving the plant, do not repot immediately but wait at least 6-12 months or if the roots are beginning to get crowded and growing through the drainage holes.
Repot in the spring, using a 2" bigger pot to keep the roots drier. (Too big of a pot could cause the soil to dry slower, which is not helpful.) Use a well-draining indoor potting mix with perlite to help with drainage. Water your plant in the old pot before transferring over and let sit an hour. Place a piece of screening at the bottom of the container over the drainage hole to secure the soil and allow to drain.
Add soil to the bottom to elevate the root ball. Lift the plant and release the roots against the existing planter. Use a clean knife or garden trowel to wedge between the pot and the soil to loosen. Inspect the root ball. Notice if there are any dead or rotting roots and trim off with sterile pruners. If the plant is rootbound, cut through the roots to alleviate continued encircling. Ensure the plant is sitting about 1" below the edge of the pot to avoid water spillage. Add more soil and backfill around the sides by tamping down. Fill up to the soil line but not over. Water thoroughly, leaving the soil damp but not soggy. If settling occurs, add more soil.
-
CleaningMonthly
Prune the leaves to stimulate new growth by cutting in front of a leaf node. Trim off any dead or damaged stems to keep them healthy.
-
PropagationCuttings
Stem Cutting: In early summer, take a stem cutting, use sharp pruners to remove a cutting from a tip off the vine. Cut at least 4-6 inches of stem to propagate. Place in a vase with water to root. Change the water each week with filtered, bottled, or tap water sitting at least 24 hours. After 3-4 weeks, check to make sure the stem has 1-2 inch, well-formed roots. If so, it is time to plant. *Fill a small container with drainage holes (too large of a container for the cutting will make it challenging to regulate watering needs) using an indoor well-draining potting mix. Mix a little rooting hormone into the soil. Poke a hole in the soil with a pencil. Then, place the cutting in the hole and tamp the soil down around them. Water the plant and keep them in medium to bright indirect sunlight. After 4-6 weeks, the roots should establish.
-
-
-
LightMedium
Medium to bright indirect light. Never direct sunlight.
-
WaterMedium
Enjoys being on the moist, but not soggy side.
-
HumidityHigh
Enjoys high humidity. Spritz occasionally.
-
Temperature 60 to 75
Avoid cold drafts under 50°F and no hotter than 95°F during the day.
-
Hardiness Zones9|10|11
Outside: Grow in early morning sun (2-4 hours) where nights are above 50°F.
Indoors: The Fiddle Leaf Fig prefers bright, indirect light for at least six hours in a southern, eastern and western windows.
-
FertilizingMonthly
Fertilize once a month during the growing spring and summer with a balanced liquid fertilizer or topical granular soil fertilizer. Let the plant rest in the fall and winter.
-
Re-pottingYearly
When receiving the plant, do not repot immediately but wait at least 6-12 months or if the roots are beginning to get crowded and growing through the drainage holes.
Repot in the spring, using a 2" bigger pot to keep the roots drier. (Too big of a pot could cause the soil to dry slower, which is not helpful.) Use a well-draining indoor potting mix with perlite to help with drainage.
Water your plant in the old pot before transferring over and let sit an hour. Place a piece of screening at the bottom of the container over the drainage hole to secure the soil and allow to drain. Add soil to the bottom to elevate the root ball. Lift the plant and release the roots against the existing planter. Use a clean knife or garden trowel to wedge between the pot and the soil to loosen.
Inspect the root ball. Notice if there are any dead or rotting roots and trim off with sterile pruners. If the plant is rootbound, cut through the roots to alleviate continued encircling.
Note: If your Fiddle Leaf Fig has outgrown their space inside, cut back the roots by 20% to stunt their growth and add new potting soil to the existing container.
Ensure the plant is sitting about 1" below the edge of the pot to avoid water spillage. Add more soil and backfill around the sides by tamping down. Fill up to the soil line but not over.
Water thoroughly, leaving the soil damp but not soggy. If settling occurs, add more soil.
-
CleaningMonthly
Gently wipe clean with a soft, damp cloth or paper towel. Work gently from the stem's base toward the leaf's tip, cleaning both sides at once. After cleaning the leaves, remove any dead leaves or debris on the surface of the soil.
Refreshen the soil mixture if needed.
Prune away damaged or diseased leaves down to the stem base with sterile scissors. To prune the Fiddle Leaf Fig, cut between two nodes (where the leaves emerge from the stem). Here the plant will stimulate new growth and branch into two stems, and form young leaves making the fig bushier. Use the pruned stems for propagation.
-
PropagationStem Cutting
Take a cutting between two nodes (where the leaves emerge from the stem) with several leaves on the cutting.
Cut the leaves in half in order.
Place the cuttings in a clean glass jar filled with filtered or bottled water and place in a bright, indirect light spot. Change the water each week. After several weeks, white spots will begin to appear on the stem and after approximately 6-8 weeks, roots will emerge.
Use a pot with drainage. and place the roots and stem in damp, well-draining, moist potting soil mix and tamp down around the stem to secure.
Place the stem at least 1-2 inches down into the soil. Set them in bright, indirect sunlight while they are rooting.
Check the moisture and humidity each day and add misting to keep the soil moist while the roots establish.
After 6-8 weeks, roots will begin to establish. You can tug onto the stem to ensure the roots are secure.
-
Customer Reviews
- LDLindy D.Verified BuyerReviewingYour Indoor Jungle DeliveredI do not recommend this productWhat is your plant experience? BeginnerRated 1 out of 5 stars1 year agoQuite pricey for some sad plants
My extra large plants were very small :/
Dirt had spilt everywhere in the bags they were delivered in.
The bags were tied so tight that removing them caused a huge mess.
The pots were not the size that were described to me when purchased so my planter pots were all too big.
My flower died with in two days :/
Was this helpful? - BBBillie B.Verified BuyerReviewingYour Indoor Jungle DeliveredI recommend this productWhat is your plant experience? BeginnerRated 5 out of 5 stars1 year agoI love my plants and
I love my plants and how fast I received them thank you
Was this helpful? - WSWendy S.Verified BuyerReviewingYour Indoor Jungle DeliveredI recommend this productRated 5 out of 5 stars1 year agoPlant arrived safely, in healthy
Plant arrived safely, in healthy condition. It is lovely!
Was this helpful? - NBNicholas B.Verified BuyerReviewingYour Indoor Jungle DeliveredI recommend this productRated 5 out of 5 stars1 year agoIndoor jungle purchase
The plants came in excellent condition, and very healthy.
Was this helpful? - YGYolanda G.Verified BuyerReviewingYour Indoor Jungle DeliveredI recommend this productRated 4 out of 5 stars1 year agoGreat unexpected gift that lasts beyond the date.
Purchased these as a gift for my daughter. She was very excited, expressing her desire to have more plants in her home.
Was this helpful?
Follow us @livelyroot & show us your #livelyroot plants