Care Level: I'm Easy
Pet Friendly: Yes
Turn any space into a paradise!
Get surprise, pet-friendly plant friends delivered to you and immediately create your new favorite green space. Get ready for your own personal urban jungle that you and your dogs or cats can enjoy with just one click.
*Plants ship in grower pots
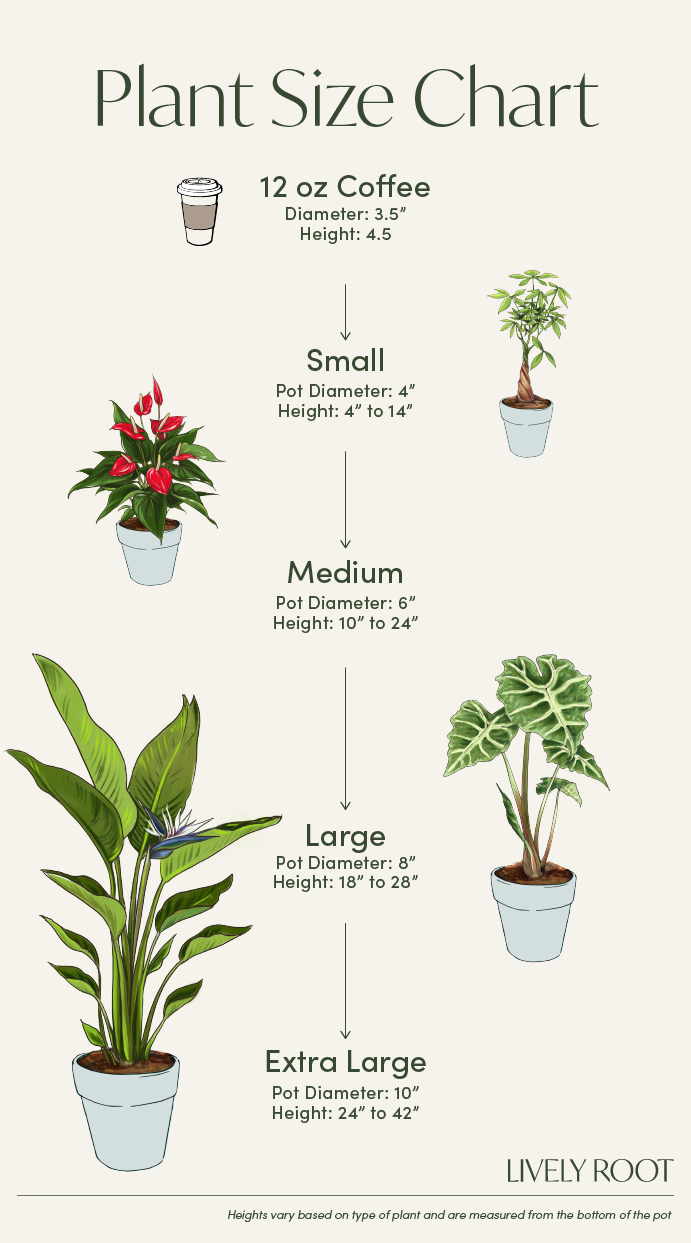
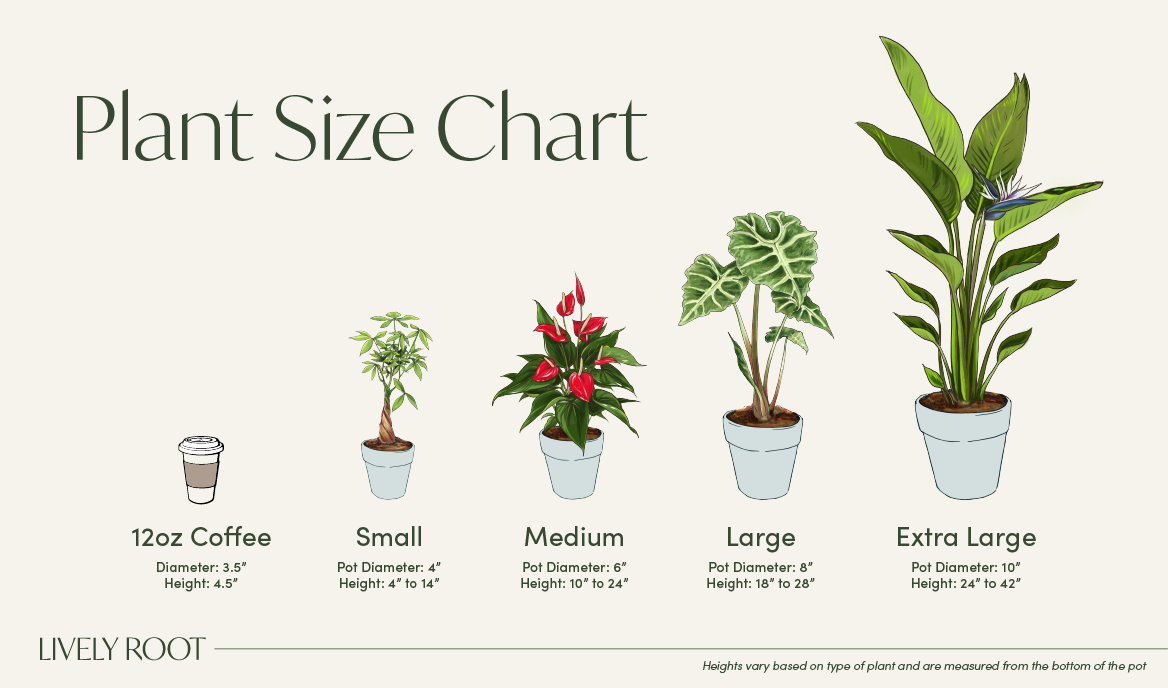
Numbers of Plants Included In Each Pet-Friendly Jungle
Tiny Jungle - 2 Small & 2 Medium
Urban Jungle - 2 Small & 2 Medium & 2 Extra Large
The Amazon - 4 Small & 4 Medium & 2 Extra Large - MOST POPULAR!
I'm In The Jungle Book - 4 Small & 4 Medium & 4 Extra Large - BEST BANG FOR YOUR BUCK!
Care Level: I'm Easy
Pet Friendly: Yes
Enjoys medium to bright indirect sunlight indoors or in full shade, frost-free outdoor areas.
Keep consistently moist but can be forgiving if neglected at times.
These plants enjoy high levels of humidity indoors and outside.
Keep this plant on the warmer side and avoid cold drafts.
Outside: Keep them in full shade on a patio out of direct sunlight to prevent leaf burn where nights are above 55°F
Apply at half-strength a balanced, liquid fertilizer especially formulated for indoor plants every month.
When receiving the Lemon Button Fern, do not repot immediately but wait at least 6-12 months or if the roots are beginning to get crowded and growing through the drainage holes. They prefer to be a little crowded in their pot.
Repot in the spring, using a 2 inches bigger pot to give the roots room to spread.
Place a piece of screening at the bottom of the container over the drainage hole to secure the soil and allow to drain. Use a rich, well-draining indoor potting mix amended with 25% compost and to help with fertility.
Water your plant in the old pot before transferring over and let sit an hour.
Add well-draining potting soil amended with peat moss and perlite to the bottom to elevate the root ball. Lift the plant and release the roots against the existing planter. Use a clean knife or garden trowel to wedge between the pot and the soil to loosen.
Inspect the root ball. Notice if there are any dead or rotting roots and trim off with sterile pruners. If the plant is rootbound, cut through the roots to alleviate continued encircling.
Ensure the plant is sitting about 1 inch below the edge of the pot to avoid water spillage. Add more soil and backfill around the sides by tamping down. Fill up to the soil line but not over.
Water thoroughly, and unlike their cousins, they like to have a bit drier soil conditions. If settling occurs, add more soil.
Water well to dampen the soil and let drain.
When watering your fern, it is an excellent time to trim off any browning, yellowing, or discolored leaves. Cut the stem all the way back to the base. To revitalize them, cut all the old foliage down to the crown and avoid cutting off any rolled fiddleheads that are popping up. This will eventually produce new foliage for the year and keep your plant healthy.
Propagate and divide your Lemon Button Fern in the spring.
Hydrate the plant the night before.
Pull from the container and carefully divide or cut through the clump with a sterilized knife. Repot the fern in rich, indoor peat-based potting soil mix amended with a rooting hormone. Be aware that each new plant needs several leaves with sufficient roots attached.
Use a container 2 inches bigger than the root ball with drainage and deep enough for their roots to grow. Place the plant at the same level as the previous pot adding soil at the bottom.
Water the soil and add more soil if settling occurs.
Set them in medium to bright, indirect sunlight while they are rooting. Place a large, clear plastic bag, spritz with water on the interior and place over the new plant to create a humid environment. This particular fern does better with dryer soil conditions. Water weekly and keep on a consistent schedule.
Check the moisture and humidity each day and add misting to keep the humidity high while the roots establish.
After 6-8 weeks, roots will begin to establish. You can tug onto the stem to ensure the roots are anchoring well. Remove the plastic bag but keep the air humid around them with a pebble tray and misting.
Prefers medium levels of indirect light.
Water well and then allow the soil to dry out between each watering.
Enjoys humidity. Spritz occasionally.
Keep this plant on the warmer side and avoid cold drafts below 50°F or it could slow their growth.
Outside: Keep them in full shade on a patio out of direct sunlight to prevent leaf burn where nights are above 50°F.
Apply a slow release fertilizer to the soil surface and as you water, the nutrients will release. Replenish as needed. Follow this fertilizing in the spring and summer months and slow down during the fall and winter time.
When receiving the Neanthe Bella Palm, do not repot immediately but wait at least 6-12 months or if the roots are beginning to get crowded and growing through the drainage holes.
Repot in the spring, using a 2 inches bigger pot to give the roots room to spread.
Place a piece of screening at the bottom of the container over the drainage hole to secure the soil and allow to drain. Use a rich, well-draining indoor potting mix amended with 25% compost and to help with fertility.
Water your plant in the old pot before transferring over and let sit an hour.
Add well-draining potting soil amended with perlite and rooting hormone to the bottom to elevate the root ball. Lift the plant and release the roots against the existing planter. Use a clean knife or garden trowel to wedge between the pot and the soil to loosen.
Inspect the root ball. Notice if there are any dead or rotting roots and trim off with sterile pruners. If the plant is rootbound, cut through the roots to alleviate continued encircling.
Ensure the plant is sitting about 1 inch below the edge of the pot to avoid water spillage. Add more soil and backfill around the sides by tamping down. Fill up to the soil line but not over.
Water thoroughly, and if settling occurs, add more soil.
Water well to dampen the soil and let drain.
When watering your palm, it is an excellent time to trim off any browning, yellowing, or discolored leaves. If tips of the leaves are browning, trim the ends off to help the plant regain strength. Remove any debris from the soil and replenish if needed. To clean debris and dust off the leaves:
Place the palm in a shower or tub.
Fill a watering can with a shower spout with filtered, bottled, or water free of chlorine and fluoride.
Shower the leaves, so each one is clear of dust and dirt.
Let the water drain and replace your palm in the decorative container.
To propagate your Neanthe Bella Palm:
Water your plant the night before dividing.
Inspect your plant for overcrowding. If it is root-bound in the pot, loosen the dirt around the root clump and brush away the soil.
Begin to tease and pull apart the mass of roots.
Ensure you have several healthy stalks and leaves attached to the clumps.
Divide each clump into its pot, measuring 2 inches wider than the root mass and deep enough for its roots to grow.
Plant in well draining potting mix amended with rooting hormone. Place the plant at the same level as the previous pot adding soil at the bottom. Water the soil and add more if settling occurs. Set it in medium, indirect sunlight.
Check the moisture and humidity each day and add misting to keep the soil moist while the roots establish. After 6-8 weeks, roots will begin to develop. You can tug onto the stem to ensure the roots are anchoring well.
Keep the air humid around it with a pebble tray and misting.
Some die off of stems may occur from transplant shock. If this happens, cut the branches away and continue to hydrate, and keep the humidity level at a medium level while it recovers. Adding a rooting hormone during planting will help diminish the symptoms of transplant shock.
Prefers medium levels of indirect light.
Water well and then allow the soil to dry out between each watering.
Enjoys humidity. Spritz occasionally.
Keep this plant in warmer temperatures and avoid drastic changes in temperature.
This plant likes warmer temperatures and can be acclimated to part shade to full sun over time. Bring in when temperatures dip below 35°F.
Add a time-release fertilizer to the top of the soil in the spring. This will be sufficient throughout the season. Do not fertilize in the fall and winter months.
When receiving the plant, do not repot immediately. Wait at least 6-12 months, or until the roots begin to crowd and grow through the drainage holes.
This plant likes to be a little snug in its pot so there is no reason to repot initially. If the soil is aged, repot in the spring, using a 2" bigger pot to keep the roots drier. Use a well-draining indoor potting mix with perlite to help with drainage or use a palm soil mix.
Place a piece of screening at the bottom of the container over the drainage hole to secure the soil and allow water to drain. Add soil to the bottom to elevate the root ball.
Be aware that the roots are brittle, so carefully remove as much soil around the roots as possible to replace the aged soil and fertilizer deposits.
Very carefully lift the plant and release the roots against the existing planter. Use a clean knife or garden trowel to wedge between the pot and the soil to loosen.
Inspect the root ball. Notice if there are any dead or rotting roots and trim off with sterile pruners.
Ensure the plant is sitting about 1" below the edge of the pot to avoid water spillage. Add more soil and backfill around the sides by tamping down. Fill up to the soil line but not over.
Water thoroughly, leaving the soil damp but not soggy. If settling occurs, add more soil.
Remove any dead fronds down to the base of the plant. Remove any debris on the soil and replenish soil when needed.
This plant is hard to propagate. We recommend getting a small plant to nurture!
This plant prefers low to medium levels of indirect sunlight.
Water well, but make sure the soil doesn't become soggy.
Does well with moderate humidity.
Spider plants will endure temperatures as low as 35°F without injury, but temperatures below 65°F retard growth. Temperatures above 90°F will not immediately damage the plant but raise the transpiration rate and increase the uptake of potentially toxic micronutrients.
Outside: Grow in morning light, partial shade (4-6 hours) where nights are above 45°F.
Indoors: This plant prefers bright, to medium indirect light for at least six hours in a southern, eastern and western windows.
Fertilize bimonthly during their growing period. Use a balanced liquid fertilizer at 1/2 strength. Reduce fertilizing during the fall and winter months while the plant is in their dormant phase. If brown tips form, withdraw from fertilizing. Raise the humidity around them and never use chlorinated or fluoride in the water.
Repot the Spider Plant in the early spring in a well draining soil mix. Use a container with drainage holes. Add a piece of screen to keep the soil from spilling out but allowing drainage. Water the plant ahead of time to hydrate. Add the mix to the bottom of the new slightly larger container. Tease the roots if they are root bound in the pot. Carefully place them in the center, adding backfill around the edges. Leave a 1/2 inch of space between the soil and the top edge to prevent water spillage. Water thoroughly and let drain.
If foliage needs a trim back, use sterilized scissors. Cut back to the base of the stem and the spiderettes. Trim off any blackened or brown tips to keep energy going to the main plant. Remove any dead, damaged or diseased leaves and clean debris from soil. Replenish soil as needed.
Remove a spiderette from the mother plant. Dip the end where the leaves originate into rooting hormone powder. Place in dampened soil. Cover the spiderettes with a clear, plastic bag and mist. Check soil moisture periodically. Within six weeks, the roots should be getting established. Place in bright to medium, indirect light and follow care instructions.
Bright, indirect light to filtered sun.
Allow the soil to dry out completely between waterings.
Enjoys moderate to high levels of humidity. Spritz occasionally.
Ideally, the Money Tree likes the room temperature at 72°F. They handle warmth rather than cold so keep them away from cold drafts.
Outside: Grow in morning light, partial shade (4-6 hours) where nights are above 45°F.
Indoors: The Money Tree prefers bright, indirect light for at least six hours in a southern, eastern and western windows.
Fertilize bimonthly during their growing period. Use a balanced liquid fertilizer at 1/2 strength. Reduce during the fall and winter months while the plant is in their dormant phase and refrain from watering as much so they can rest.
When receiving the plant, do not repot immediately but wait at least 6-12 months or if the roots are beginning to get crowded and growing through the drainage holes.
Repot in the spring, using a 2" bigger pot to keep the roots drier. (Too big of a pot could cause the soil to dry slower, which is not helpful.) Use a well-draining indoor potting mix with perlite to help with drainage. Water your plant in the old pot before transferring over and let sit an hour. Place a piece of screening at the bottom of the container over the drainage hole to secure the soil and allow to drain.
Add soil to the bottom to elevate the root ball. Lift the plant and release the roots against the existing planter. Use a clean knife or garden trowel to wedge between the pot and the soil to loosen. Inspect the root ball. Notice if there are any dead or rotting roots and trim off with sterile pruners. If the plant is rootbound, cut through the roots to alleviate continued encircling. Ensure the plant is sitting about 1" below the edge of the pot to avoid water spillage. Add more soil and backfill around the sides by tamping down. Fill up to the soil line but not over. Water thoroughly, leaving the soil damp but not soggy. If settling occurs, add more soil.
Prune the leaves to stimulate new growth by cutting in front of a leaf node. Trim off any dead or damaged stems to keep them healthy.
Stem Cutting: In early summer, take a stem cutting, use sharp pruners to remove a cutting from a tip off the vine. Cut at least 4-6 inches of stem to propagate. Place in a vase with water to root. Change the water each week with filtered, bottled, or tap water sitting at least 24 hours. After 3-4 weeks, check to make sure the stem has 1-2 inch, well-formed roots. If so, it is time to plant. *Fill a small container with drainage holes (too large of a container for the cutting will make it challenging to regulate watering needs) using an indoor well-draining potting mix. Mix a little rooting hormone into the soil. Poke a hole in the soil with a pencil. Then, place the cutting in the hole and tamp the soil down around them. Water the plant and keep them in medium to bright indirect sunlight. After 4-6 weeks, the roots should establish.
Best in medium to bright indirect light.
Water well when received, then allow the soil to dry out between waterings. Enjoys being on the moist side.
Enjoys humidity. Spritz occasionally.
Keep in their ideal temperatures so that they will remain healthy.
Outside: Keep in filtered sun to full shade. Nightime temperatures need to remain above 50°F for healthy growth.
Apply a slow release fertilizer especially formulated for rose plants because these palms like the magnesium to prevent yellow spots on the fronds. Apply once during the spring, summer and fall season. If using a liquid fertilizer, use at half strength monthly throughout the growing season. Let rest during the winter.
When receiving the plant, do not repot immediately but wait at least 6-12 months or if the roots are beginning to get crowded and growing through the drainage holes.
Repot in the spring, using a 2" bigger pot. Use a well-draining indoor potting mix with perlite to help with drainage.
Water your plant in the old pot before transferring over and let sit an hour. Place a piece of screening at the bottom of the container over the drainage hole to secure the soil and allow to drain. Add soil to the bottom to elevate the root ball. Lift the plant and release the roots against the existing planter. Use a clean knife or garden trowel to wedge between the pot and the soil to loosen.
Use sterilized pruners and remove any dead, damaged, or diseased fronds off the plant. Wear gloves to remove the sharp spines at the leaflets' base on the fronds. Prune away fronds that are at the base of the plant. It is not unusual that the plant will shed their lower leaves from time to time. To clean debris and dust off the leaves:
Place the palm in a shower or tub.
Fill a watering can with a shower spout with filtered, bottled, or water free of chlorine and fluoride.
Shower the leaves, so each one is clear of dust and dirt.
Let the water drain and replace your palm in the decorative container.
Release the soil around the sucker with a garden fork. Carefully uncover and remove the sucker and associated roots. Do not disturb the mother plant.
Using a sharp knife to cut the sucker while keeping in tack the detached portions fibrous roots. Repair and add soil around the parent plant.
Reduce long, leafy shoots by removing about half of the stem and leaves.
Plant the sucker into a well-draining potting mix with perlite added.
Water well after securing the soil around the roots. Keep a consistent watering schedule for the first year.
Show your plants you care with these accessories
Follow us @livelyroot & show us your #livelyroot plants